Hi ladies tis only I.
After a rather dissapointing result in the search for a Design Team, We figured maybe you're shy or this is not what you want.
So What would you like us to be doing on your behalf. All suggestions are appreciated and welcome.
Would you like to see whats new in the shop? Just as it is now? Or just To send in projects you have made using purchases from us and are really proud of, so that we can share them with everyone.
See the little comment Higlighted purple below this message. click on that and a window will pop up, so you can let us know. Just follow the instructions.
Tracyx

Thursday, 30 April 2009
Tuesday, 28 April 2009
A whole day of Dazzling Blingy Beads
Beginners Jewellery Workshop
Saturday 23rd May 10am - 4pm.
Ever Fancied trying your hand at Jewellery Making?
Saturday 23rd May 10am - 4pm.
Ever Fancied trying your hand at Jewellery Making?
Why not book yourself into this all day workshop.
You will learn all the basic skills needed to get you up and running; and take away not one, not two, but THREE completed projects.
You will be in the capable hands of Lynn, Ruth and Katie who will guide and instruct you through three fun projects.
What are you waiting for?
We will supply all the materials needed, you get to choose your colour scheme.
All you need to do is book your slot, bring yourself, a light lunch and enjoy!
For the full day and three complete workshops the cost is only £40.00
Book early to avoid disappointment.
Contact Flutterby Crafts on 01635 860900
Monday, 27 April 2009
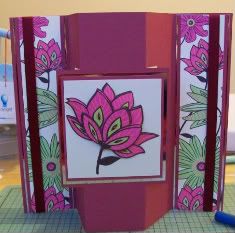
Tutorial for you!
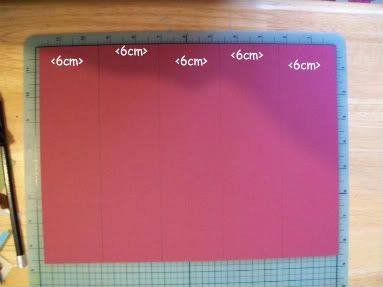
 Okay Step 1) Take a piece of 12" x 12" and cut to 21.5cm tall x 30cm wide
2) turn over the cardstock , then across the width with a pencil measure and mark score lines but do not score yet at 6cm. 12cm, 18cm, and 24cm.
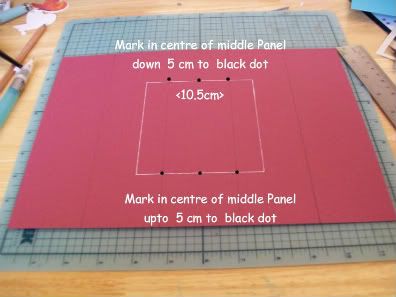
3) On the middle panel find the midway point of the width at the top and measure down 5cm from the top and do the same at the bottom; up. This is shown in the photo below the centre black dots. (I have also marked the side of the panel at this measurement just to help me keep straight). From the centre dot measure out 5.25cm either side top and bottom and draw a line.
Join the two sides together so you now have a rectangle.
4) With a craft knife cut as shown in the photo below on both sides (marked with the black dotted line).
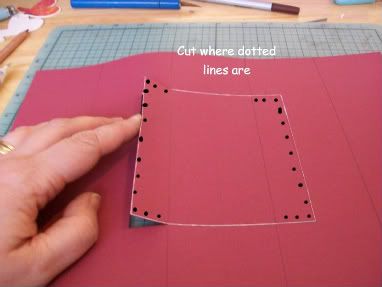
5) Now score your previously marked panel lines, do not score into the rectangle. Fold as Shown.
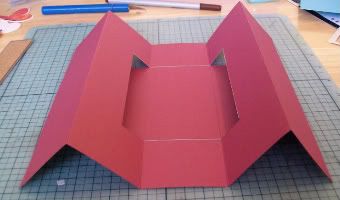
Decorate as desired, I have used Kate Knight Papers and decoupage from Trimcraft - But you can adapt to use any of the scrummy papers and embellishments available at Flutterby Crafts.
Imagine the Tilda papers and penny black stamps, Lush!! Once you have made the card once you can change the centre shape.
The Finished card fits into a Dl envelope.
Tracyxxx
Friday, 17 April 2009

I just need to do a quick bit of boasting. Who has got a gorgeous granddaughter? I just love this photo of Jet, taken early one morning. I cannot help but smile every time I look at this. I have also got some lovely photos of her at Blue Reef the other week. I will get them posted soon.
Have a good weekend. Lynn x
shhh! don't let Tracy know.....


Shhhhh! Don't let Tracy know that I am posting on the blog! I just wanted to show off the box that I decorated for my Mum and Dad for their birthday.
I painted the box using the JoSonjas acryllic paints mixed with a bit of texture paints to give it..... well....... a textured finish. I then used some of the Tilda papers to and some ribbon to decorate it. When I had finished I gave it a good covering of JoSonja matt varnish to protect it.
I then made some index cards, one for each month of the year.
Mum and Dad have just had their garden re-landscaped, so they are have just started planting out the new garden. I thought it would be a good idea for them to keep a record of the work that they are doing so they will know what to change or to keep for next year.
To finish the present I brought some packets of seeds, one for each month and put them with the appropriate month index card.
They seemed very pleased with the gift.
Have a good weekend.
Lynn x
Thursday, 9 April 2009
Been Busy
Sorry; No pictures to show at the moment, We have been so busy behind the scenes organising workshops and adding to the website. We promise we will be back with you As soon as possible.
We would love to see some of your projects you have made from your purchases at Flutterby.
Just e-mail them to tracywatkiss_1@hotmail.com and she will post hem here.
Speak soon
Tracyxx
We would love to see some of your projects you have made from your purchases at Flutterby.
Just e-mail them to tracywatkiss_1@hotmail.com and she will post hem here.
Speak soon
Tracyxx
Saturday, 4 April 2009
Sending You all Special easter wishes!!
Hello everyone and Happy Easter for next weekend from all at Flutterby.
As usual Joanna has come up trumps with the Cricut to produce this lovely card.
As usual Joanna has come up trumps with the Cricut to produce this lovely card.

Easter Card
For this card I used the Cricut George and Basic shapes cartridge and the Design Software to create my base card. I decided to use the gorgeous coordinating Craft Creations paper for the front of the card. I cut 3 eggs from the Doodlecharms cartridge and welded them to 2 rectangles to make a frame for the eggs. I then cut eggstra eggs and layered them with foam pads. I don't know why this card took me so long to make because it looks so simple now I am writing down the instructions!!!!
My new toy is my Woodware trimmer. As I could not find any coordinating ribbon to go with the paper I used my scallop cutter on the trimmer to make a ribbon effect for the top and bottom of the card. I threaded the paper ribbon through my label and computer generated the greeting. Finally I added punched flowers and Kaiser gems.
I was well chuffed with this card, firstly, as it was a challenge to weld everything together and secondly, it was the first time I had tried the ribbon technique using with my Woodware trimmer. - Joanna
Till next Time
Tracyxx
Friday, 3 April 2009
Good Morning!
I hope you are all looking forward to your weekend. I know I am. It is the first weekend this year where I am not Demonstrating. Woo Hoo!!
Dale keeps asking me what I want to do! He did look at me funny when I said visit Flutterby, cant think why.
Any way todays post is another Delish card from the very talented Joanna.

Elephant Shaped Card
"This is my favourite and does not only need to be for a child's birthday. The inside could say "sending tons of love" etc. Two elephant shapes were welded together using the Cricut Design Studio (CDS) and the Cricut Zoobaloo cartridge. One elephant shape was cut in pink Bazzill Bling cardstock in shadow function and then in pink gingham with the Craft Creations paper on normal function. To cut the ears and trunk I used the shift function and ran the pink cardstock through my Cuttlebug with the bubbles embossing folder. Wobbly eyes, pink ribbon. Kaiser Kraft flowers and gems were added. Some detail was added around the edges to highlight in a black pen. Great easy card to make and I can't wait to send this off to my friends little girl." - Joanna
"This is my favourite and does not only need to be for a child's birthday. The inside could say "sending tons of love" etc. Two elephant shapes were welded together using the Cricut Design Studio (CDS) and the Cricut Zoobaloo cartridge. One elephant shape was cut in pink Bazzill Bling cardstock in shadow function and then in pink gingham with the Craft Creations paper on normal function. To cut the ears and trunk I used the shift function and ran the pink cardstock through my Cuttlebug with the bubbles embossing folder. Wobbly eyes, pink ribbon. Kaiser Kraft flowers and gems were added. Some detail was added around the edges to highlight in a black pen. Great easy card to make and I can't wait to send this off to my friends little girl." - Joanna
Laters Tracyxxx
Thursday, 2 April 2009
Good Morning!
Its a glorious morning, here in Plymouth, Whats it like where you are?
I managed to make a card yesterday to show you all.
Here it is. All the Products are available in Flutterby NOW!

The Whole card is assembled with products I bought at Flutterby Crafts, Whilst up there last week.
The Yummy papers are double sided and from the Company Tilda - Springtime, (now this is not the little girl Tilda from the magnolia stamps, that is a whole separate company.) The brad is also from this range.
The Stamp is of Course Embrace from Penny Black, Kaiser flowers and pearls, a silver charm from Flutterbys bead shop. and all stuck together using the fabulous ATG gun. I did sneak in a labels nestie shape too. Coloured in with Sakura Metallics (flutterbys also stock these) to give a nice shiny ellie.
Laters Tracyxxx
Wednesday, 1 April 2009
Joannas' Cute Duck
Joanna Has been working the cricut again.
Just look at what she has been upto lately.

"Firstly I cut and welded 2 duck shapes on my Cricut Design Studio (CDS) using the Cricut New Arrivals cartridge in green Bazzill Bling cardstock. I then layered one duck shape in the Craft Creations green gincham paper. Some wobbly eyes, Kaiser Kraft flowers and gems were added. I found some ribbon in my very messy ribbon drawer and there you have a cute and very simple shaped card." - Joanna
Back tomorrow with another.
Tracyxx
Subscribe to:
Posts (Atom)